How to deploy a Hugo site to S3 in 2024
Posted on March 6, 2024 (Last modified on December 10, 2024) • 18 min read • 3,802 wordsA step by step guide to deploying a static website created with Hugo, from GitHub to Amazon S3. We will briefly present each technology, explain relevant concepts, best practices, and show the necessary configuration.

Keep in mind, that the sections build on each other.
Setting the stage
Situation
- You are using Hugo to generate your static web site.
- You want to safely store the source code of your website and possibly collaborate with others.
- You want to host your site on AWS for control, flexibility and performance
- You want to be able to easily deploy new changes.
Concepts
- Source Control Management
- Deployment Automation
- Cloud Infrastructure
- Static Web Hosting
- Caching
Technologies used
- Git
- GitHub
- GitHub Actions
- AWS IAM
- OpenIDConnect
- AWS S3
- AWS Certificate Manager
- AWS CloudFront
- Hugo
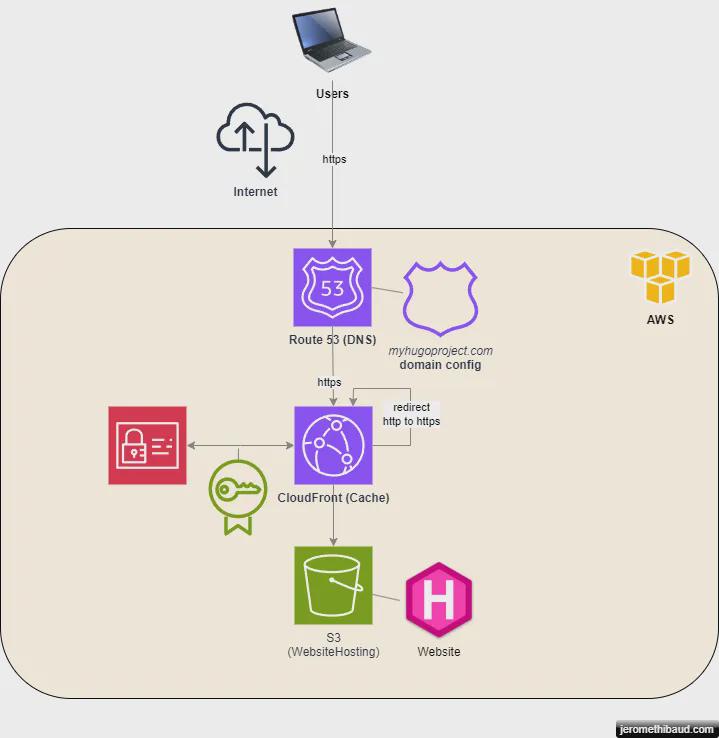
Website Hosting Topology
We want our site to be hosted and served securely from AWS. That implies:
- Secure communication using https between the users and the site
- Provide access through a convenient domain (e.g.
https://www.myhugoproject.com)
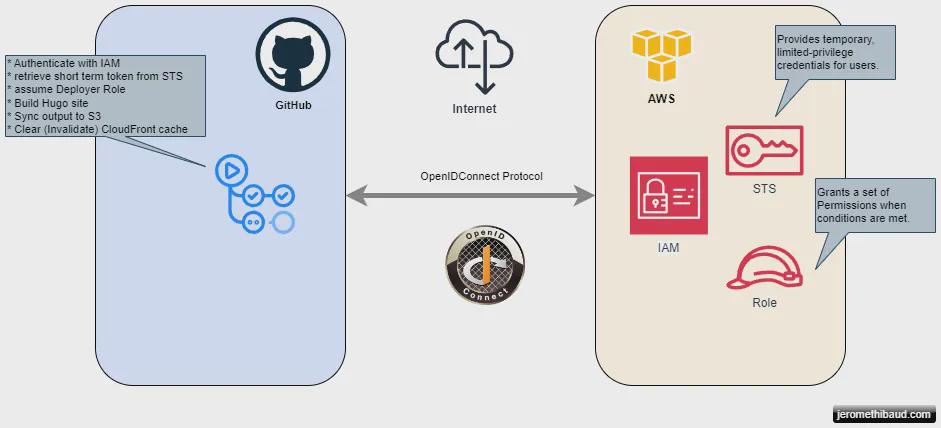
Deployment Topology
We will be using GitHub actions to automate the build and deployment of the Hugo site to S3. That implies:
- Authenticating GitHub with AWS using the OpenIdConnect protocol
- A best practice: we get short term credentials which mitigates the risks if they get compromised.
- Performing actions with the obtained credentials
- Sync to S3
- Flush the cache
The Road ahead
Hang on to your keyboard, in the following sections we will configure all the necessary services to get you up and running. For assistance beyond what is described here, get in touch .
An overview of what we will cover:
Storing your sourcecode in GitHub
GitHub is a hosted source control management service based on git. They describe themselves as “The complete developer platform to build, scale, and deliver secure software using the official action”.
Create a GitHub account
If you don’t have one already, Create a GitHub account .
Create a Repository for your project
Your top directory will be the project directory ‘my_hugo_project’ that was created when you ran the command:
hugo new site my_hugo_projectOptional
Git does not store empty folders, if you want to keep the generated project structure intact for later, you can add empty files named .gitkeep (by convention) in each folders.
Bonus: Here’s a powershell command to create a .gitkeep file in each empty sub-directories:
Get-ChildItem -Directory | `
  Foreach-Object { `
    if ( -not (Test-Path  "$_\*") )  `
    {`
      New-Item -Path $_ -Name .gitkeep `
    }`
  }
Now you will create the repository in GitHub.
Follow these instructions to create the repo.
Create your first commit and ‘Push’ your work to GitHub
If you haven’t done already in the context of the ‘Create a repository’ tutorial, create your first commit.
git add .
git commit -m "my first commit"
Then configure the remote repository and push your changes. In the example below, GH-ACCOUNT-NAME is your GitHub account name, MyHugoProject is your repository name, main is the name of your main branch.
git remote add origin git@gitHub.com:GH-ACCOUNT-NAME/MyHugoProject.git
git branch -M main
git push -u origin main
You should now have a GitHub account, a repository, and your code stored safely on GitHub.
On to Part 2: Configuring AWS Resources for Your Site .
Configuring AWS Resources for Hosting your Site
Prerequisites
For the following sections, you need some or all administrative privileges on your AWS instance. At the minimum, you will need access to administer IAM and S3 . Optionally you will need privileges for Route53 if you want to play with domain names and CloudFront if you want to configure web caching.
We will use the AWS console, a graphical interface. The same operations can be achieved using the AWS CLI .
Configuring an S3 bucket for web hosting
We will leverage a very convenient functionality of S3 which allows us to serve our static site without having to maintain a web server. We will create a bucket to contain the code of our website and configure the bucket to act as a web server with the appropriate permissions.
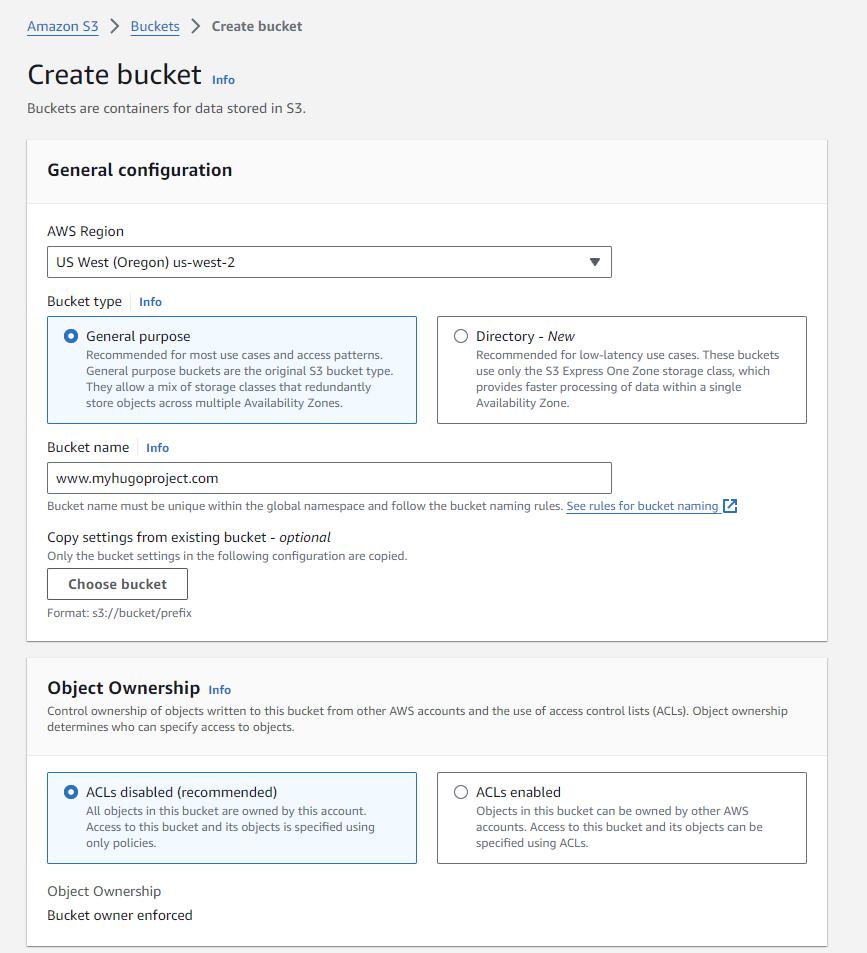
Create a new bucket
Important
- Bucket names must be globally unique
- If you decide to use Route53 and map your domain directly to the bucket without CloudFront in the middle, the name must match your domain name.
- Use your own domain name, you’re likely to conflict if you use the name in the example
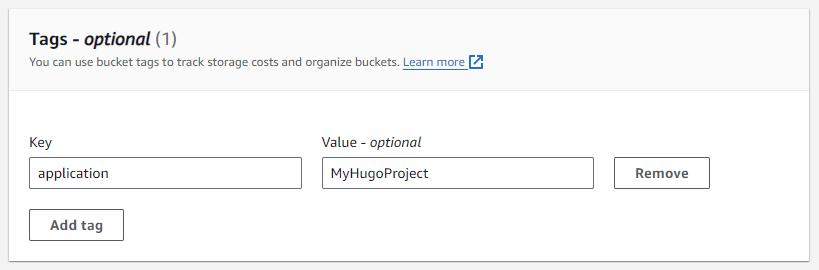
Tag it
Tag all resources you create. It is a best practice which provides context for readers and ease maintenance, monitoring and auditing of resources.
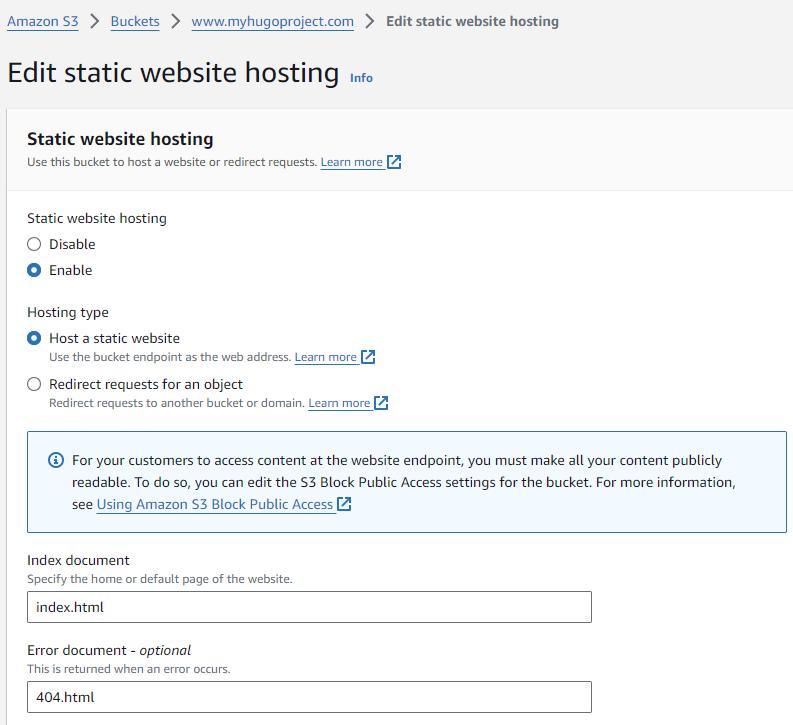
Configure it for Web Hosting
Enable web hosting
Click Create. Then select your bucket and go the Properties tab.
All the way at the bottom, edit the Website Hosting properties as follow.
Adjust Permissions
The content will soon be available to all
http://YOUR_BUCKET_NAME.s3-website-us-west-2.amazonaws.com/
That is, once you have adjusted the permissions. At this time you will get a 403 Forbidden error if to try to browse to your bucket’s url.
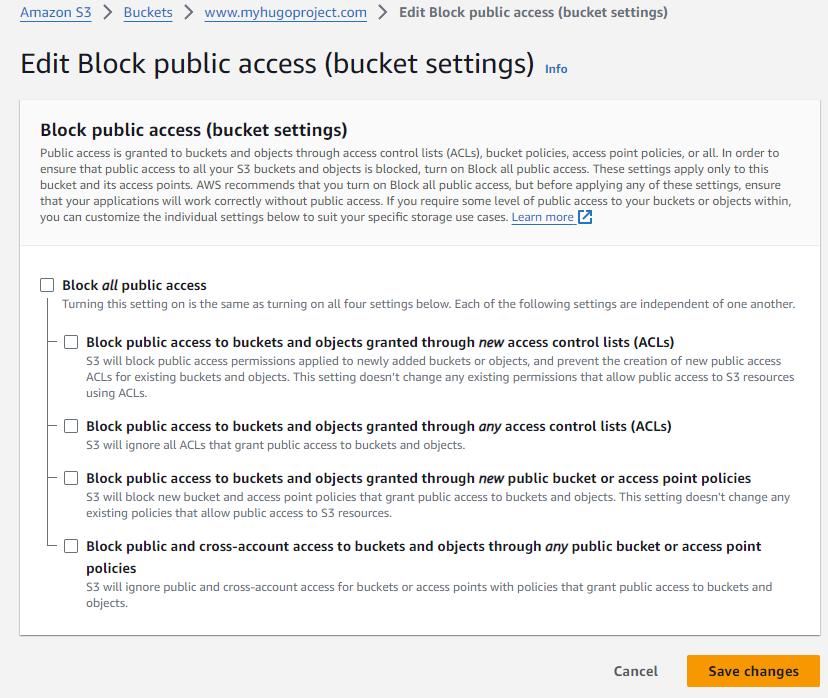
We’ll fix that in the permission tab:
Uncheck Block All Public Access and Add a Read-Only policy for all users.
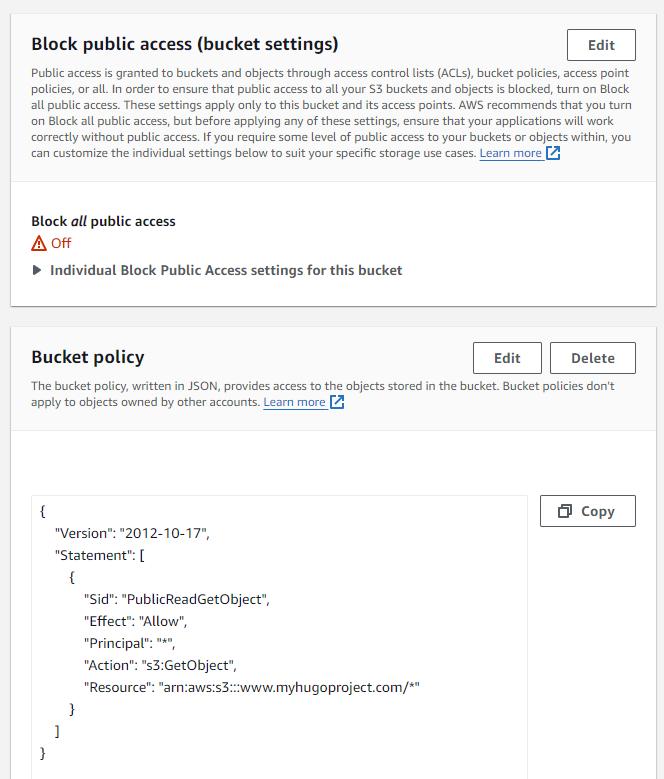
To test it, navigate to the url, you’ll now get a different error: 404 Not Found because we have not uploaded the website files yet.
If you have doubts or encounter an issue not addressed here, peruse the full AWS documentation on this topic or get in touch .
Now we will Route people to your site using Route53 DNS
Route people to your site using Route53 DNS
http://YOUR_BUCKET_NAME.s3-website-us-west-2.amazonaws.com/ works and now you want it accessible via a memorable domain name.
We will use myhugoproject.com in our example, you will use whichever domain you have registered for your site. If you have not registered a domain yet, you will need to in order to validate the certificate and route internet traffic to your site. If you have not done so already, you can register a domain name in Route53
(not covered in this tutorial).
“All roads lead to YourWebsite”
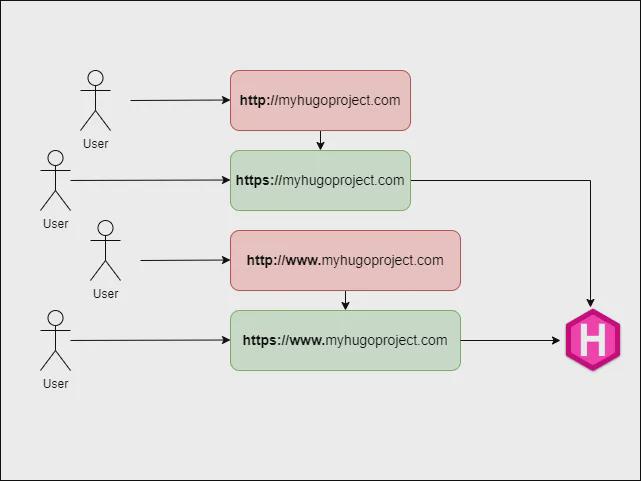
We want to support the following browsing experience for our users:
- ensure that they always use a secure communication
- be forgiving about a missing subdomain
For this purpose we will configure our DNS service: Route53.
Create a Hosted Zone in Route53
We will manage the domain redirection part in the DNS as records in the hosted zone.

Because at this stage we have not created our CloudFront distribution yet, we cannot yet complete the DNS setup and will revisit the remaining configuration as we configure CloudFront.
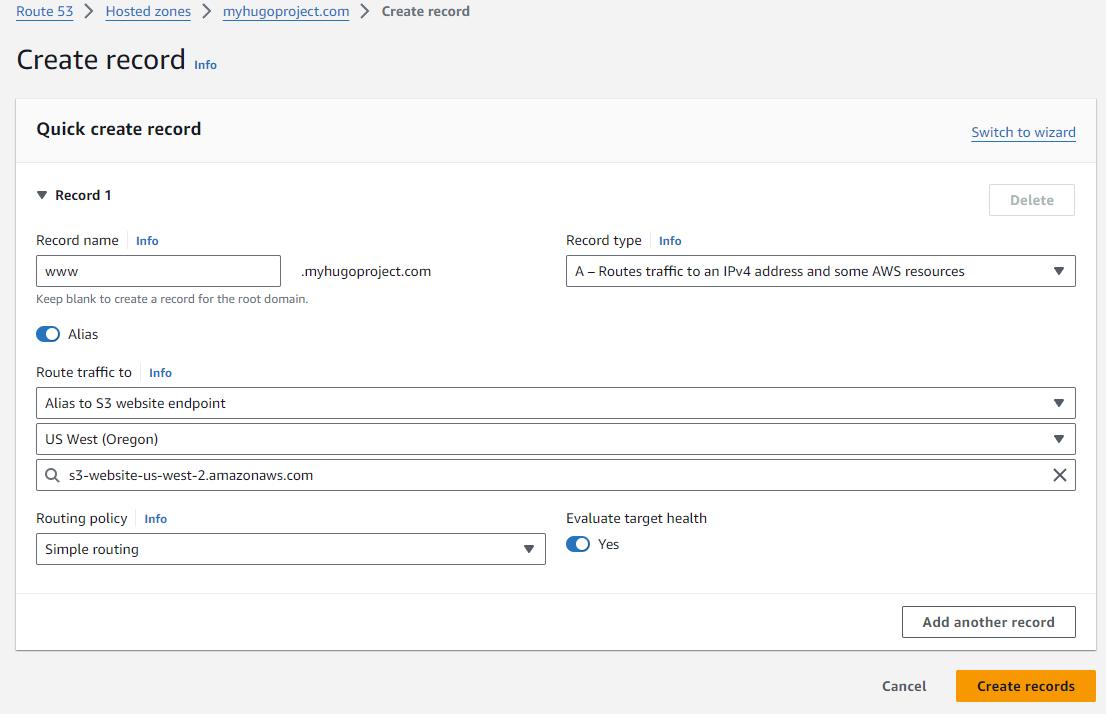
Optional: Configure and Test access to your site using your domain name
We can give ourselves a little taste of success by mapping the www.myhugoproject.com domain to our Website bucket.
If you want to see something more satisfying feedback, upload a simple index.html file at the root of your bucket.
We have enough DNS setup to go on, we will get back to complete the DNS configuration in subsequent steps. On to Part 3: Making your site secure and fast for everyone with CloudFront and Https
Making your site secure and fast for everyone with CloudFront and Https
Secure communications with Https
We will configure our site to use https for all communications with the users. So that no one can eavesdrop or tamper with the messages. The security of https is achieved using TLS .
The server (that’s your website hosted on AWS) will provide the user’s client (likely a browser) with a certificate that proves, through a chain of trusted authorities, that you are who you say you are. In our example, we are www.myhugoproject.com.
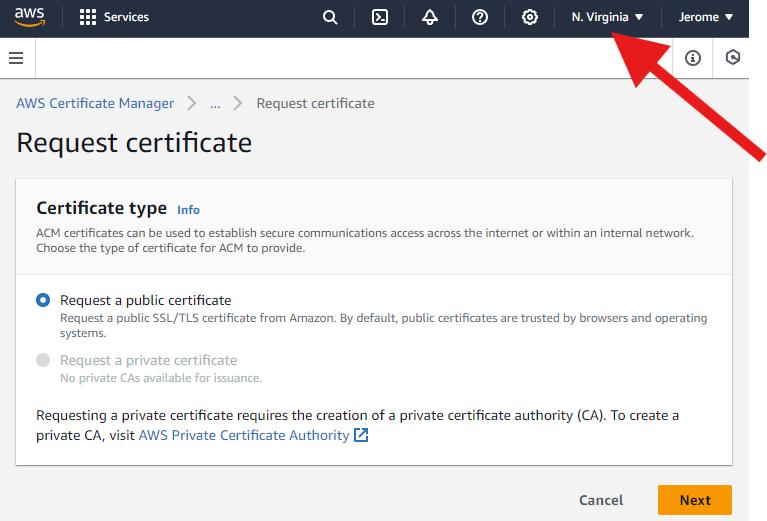
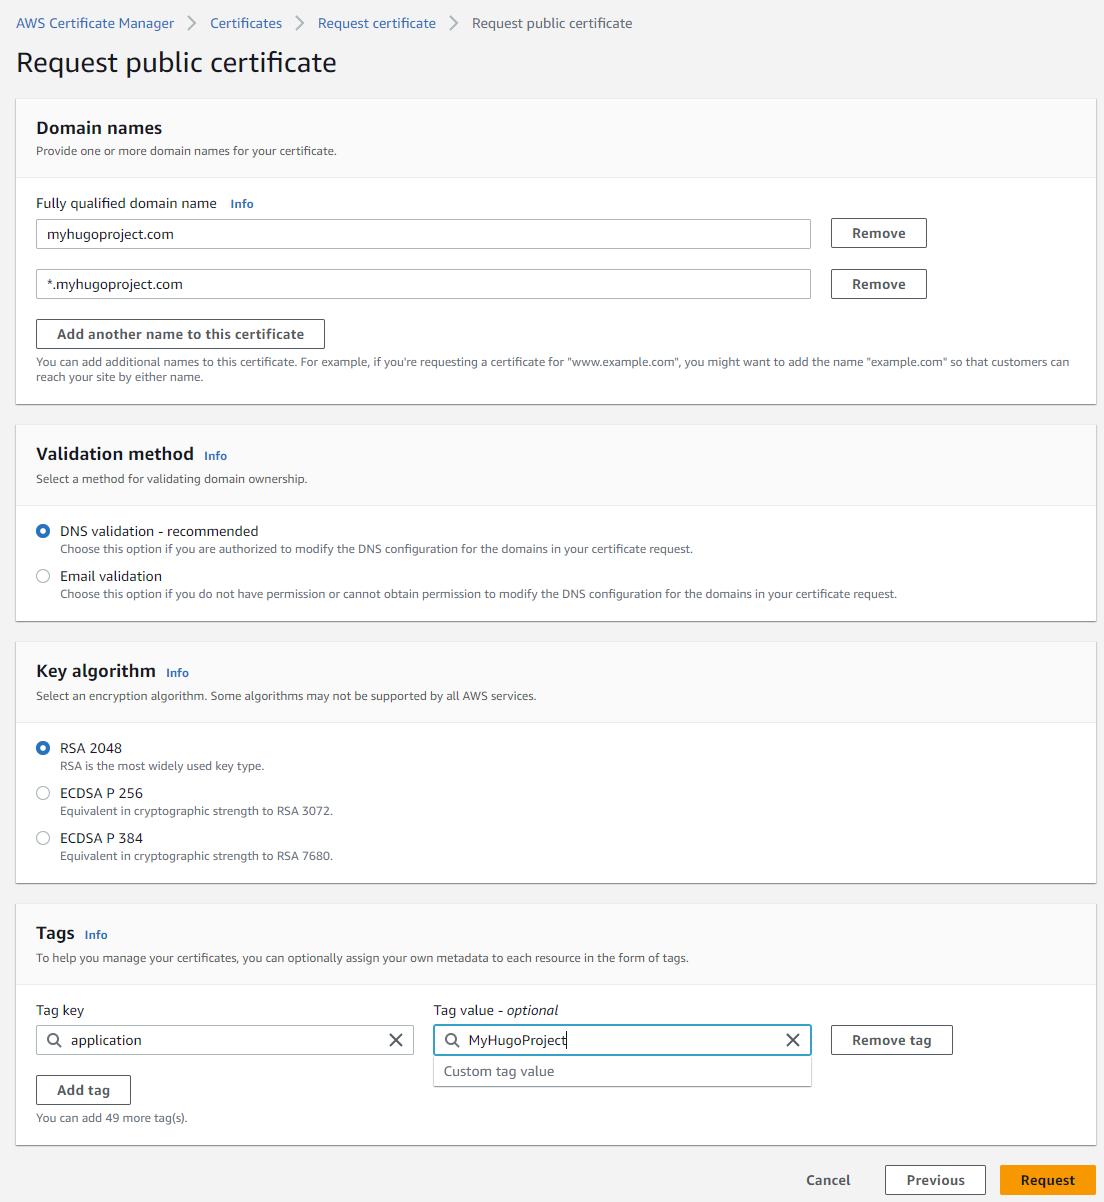
Creating the Certificate for HTTPS communication
There are many ways, to obtain a certificate, since we’re on AWS, let’s use Certificate Manager
Important since we intend to use this certificate with CloudFront, it must be issued on the us-east-1 region, that’s North Virginia.
Important
For compatibility with CloudFront, we must make sure that the certificate mentions explicitely the root domain and the wildcard subdomain. In our example, that’s:
- myhugoproject.com
- *.myhugoproject.com (which covers www.myhugoproject.com while allowing additional subdomains in the future)
Validating the Certificate using the DNS service
Back to the certificates list, you’ll notice that the certificate is pending validation. It will remain in that state until we can prove that we own this domain.

Click on your on your certificate and take note of the Domains section (note that the values are redacted in this example)
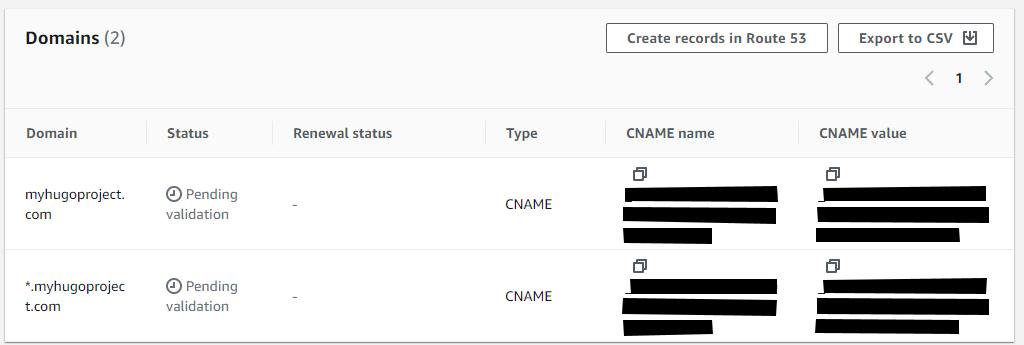
You will now go back to your Hosted Zone configuration you created for your domain and add a CNAME record that Certificate Manager will use to validate your ownership of the domain.
for ex, if, in the Certificate screen, the CNAME name value is:
_78978897897eeeeqwewqe78970787.myhugoproject.com.the value in the subdomain field should be entered as:
_78978897897eeeeqwewqe78970787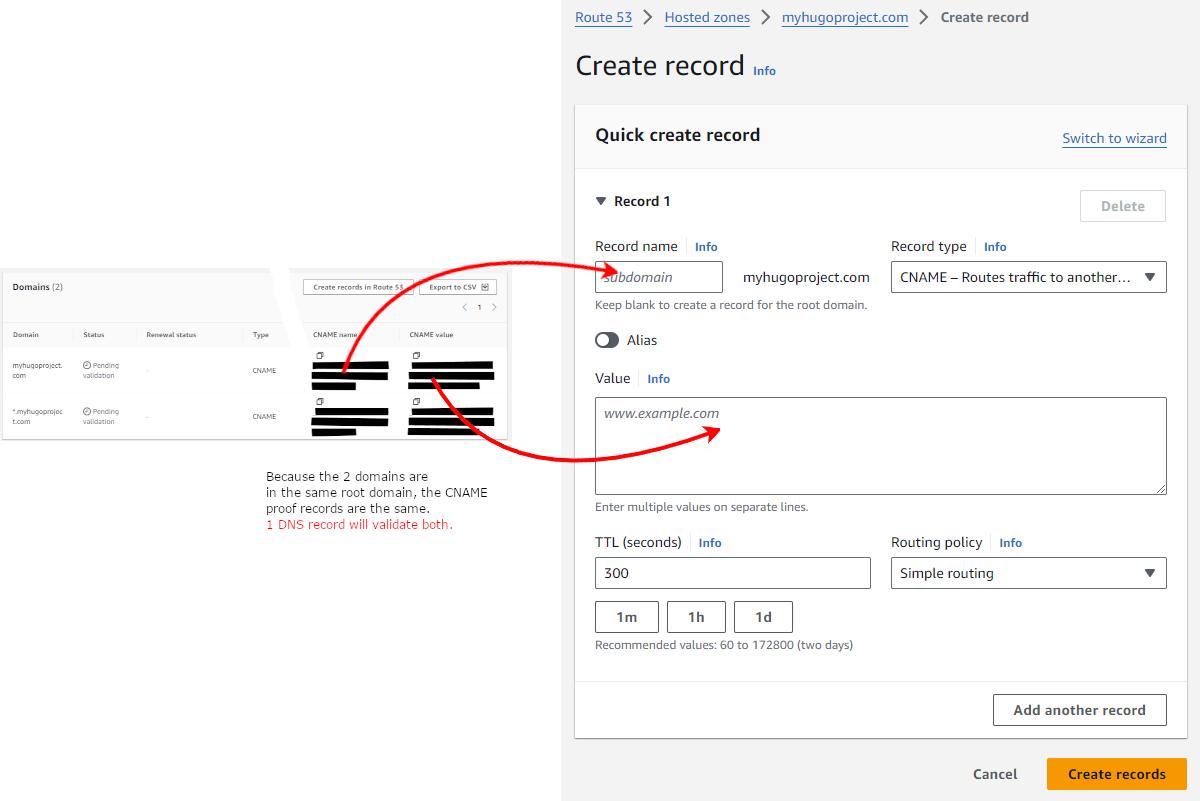
Create the record and within a few seconds to minutes, the certificate status should change to Issued.

Now that we have a valid issued certificate, we can configure https communication using CloudFront.
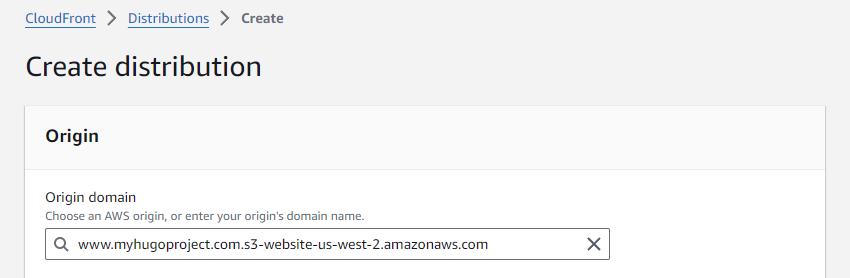
Creating a CloudFront distribution
Caching and Content Delivery Networks (CDN) are keys to providing fast access to your site around the world. CloudFront is the CDN offering from AWS.
Create a distribution and use default settings aside from the changes listed below:
Select your S3 website bucket, accept switching to the website endpoint when prompted.
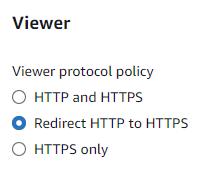
Redirect http traffic to https effectively forcing secure communication.
We will skip WAF in the context of this walkthrough. You should consider the need for such protection based on your specific situation.

The domain and subdomains in the Alternate domain name (CNAME) (in the screenshot below) must match the domains listed both in the certificate and the DNS CNAME records for, in our case,
myhugoproject.com and www.myhugoproject.com (which is covered under *.myhugoproject.com).
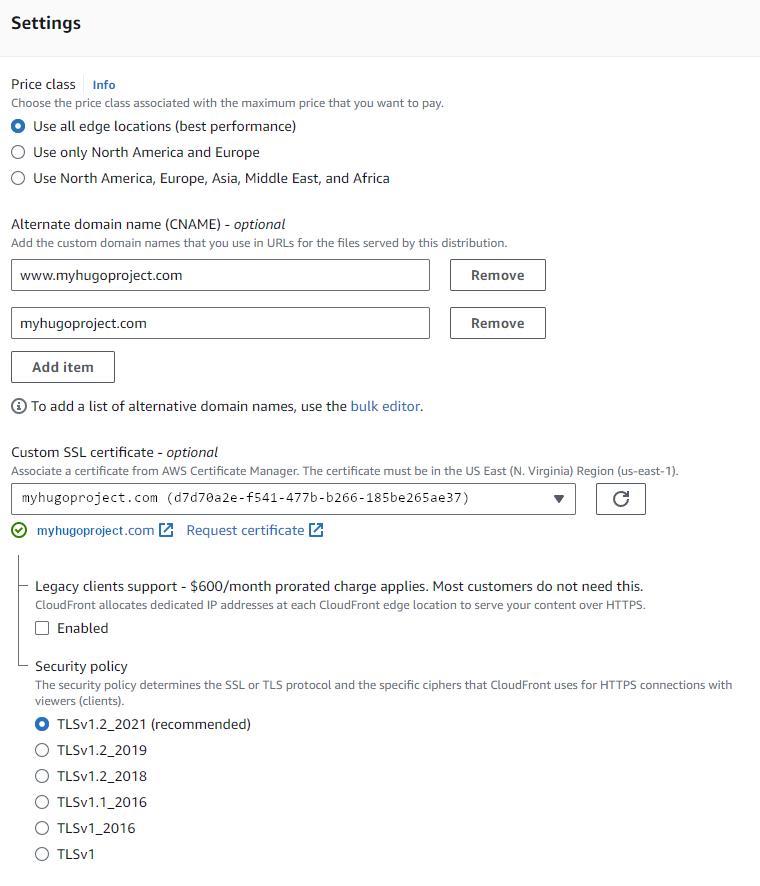
An informative description will help with context when viewing this piece of configuration in the future.

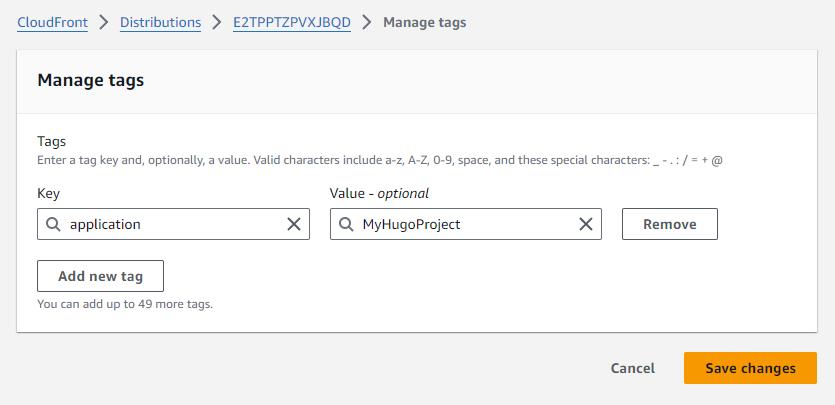
Same as a good description, consistent tagging helps with infrastructure management.
Now we will revisit the DNS configuration and direct traffic to our CloudFront distribution .
Direct traffic to the CloudFront distribution
In this step, we are revisiting the DNS configuration and will add the necessary record to route traffic to myhugoproject.com and www.myhugoproject.com to the CloudFront distribution (our cache and https enforcement mechanism).
As a reminder this is what we’re going for:
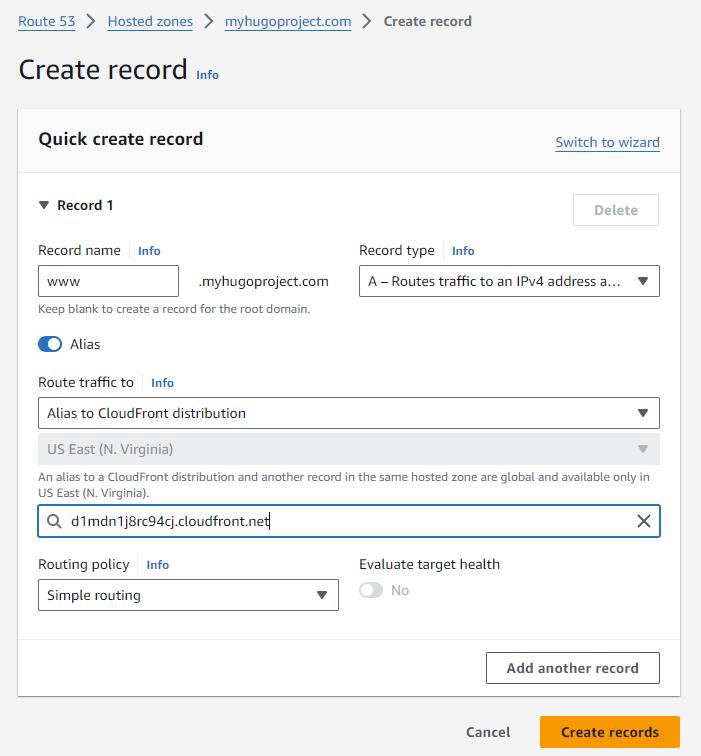
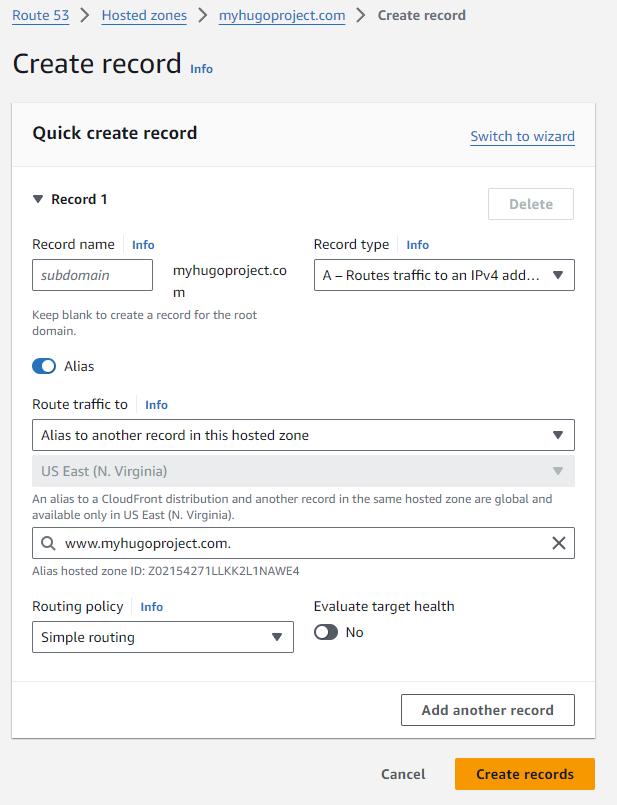
Pointing the www subdomain to CloudFront
We first will add (or replace) the A Record for the **www. subdomain **.
Pointing the apex domain to www
Now we want to make sure that we catch people who didn’t type the subdomain in the address (http://myhugoproject.com). Making sure that they transparently get served the content of http://www.myhugoproject.com. You will notice that they are not redirected, their browser URL does not change. An alias is created: a different name for the same thing.
We are all set, the internet traffic should now flow to the CloudFront distribution. You should be able to test and observe that when you enter http:// you get redirected automatically to https://. Additionally you should get to the bucket and get either a 404 if your bucket is still empty or whatever index.html page you added there.
Now, in that last phase, let’s configure the deployment from GitHub to S3 .
Configure the Deployment from GitHub to S3
Configure OIDC on AWS
We will follow recommended practices and use OpenIDConnect to authenticate between GitHub and AWS.
In this scenario, GitHub will be the Identity Provider (IDP) (they know who you are) and AWS will be the Relying Party (RP) (they requires end-user authentication before letting you do things). In the ID_Token, The aud (Audience) will be the AWS Security Token Service and the sub (Subject) will be your GitHub Repository.
Create the GitHub Identity Provider
First, in AWS, we must configure GitHub as an Identity Provider. This will allow AWS to properly authenticate the incoming request from GitHub and, validating that it comes from who it expects, assign it the proper role.
Log into the AWS console and go to IAM > Identity Providers
Click Add Provider
- select “OpenID Connect”
- Enter the URL provided by GitHub
- at this time it is https://token.actions.githubusercontent.com
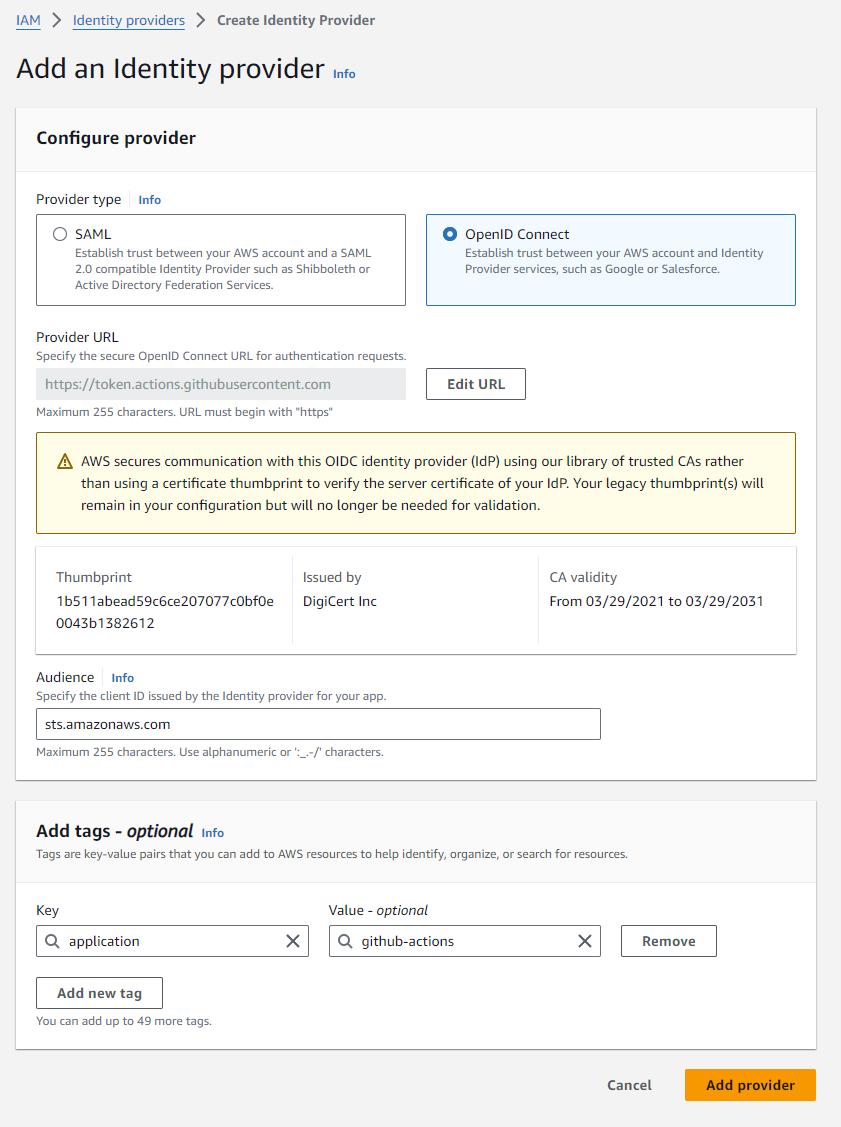
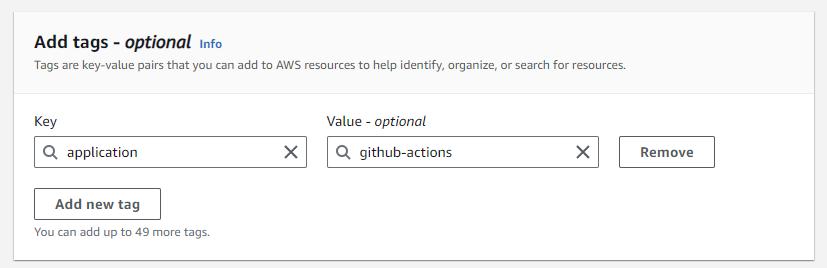
Adding Tag(s) is optional but it is a best practice to organize resources in AWS. It allows you to conveniently identify and report on resources related to a given application, purpose, etc.
Confirm your changes by clicking on Add Provider.

Now we have given a way for AWS to authenticate the incoming requests that GitHub actions will send.
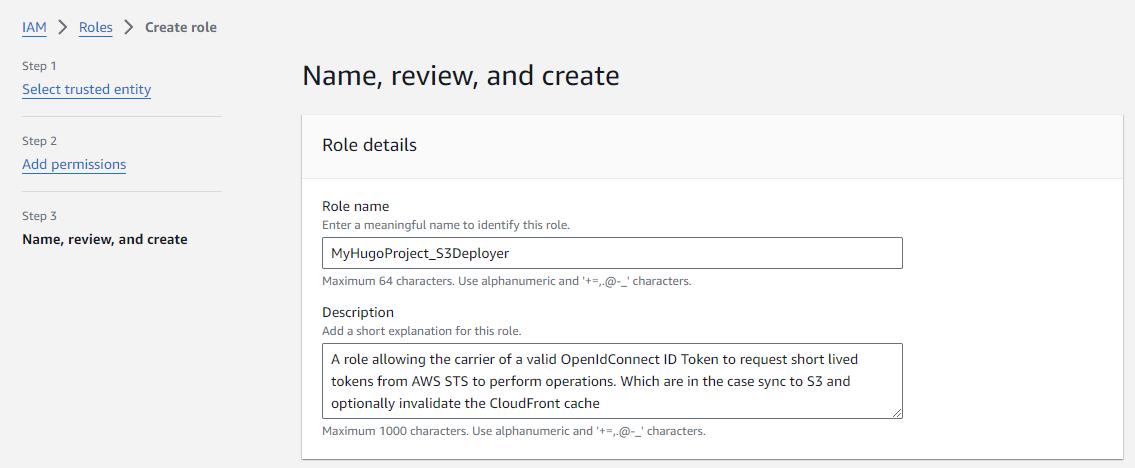
Creating a Role for deployment
Now we must create a Role which is a set of permissions to perform actions to specific resources. By creating a Role, we can limit the amount of permissions to just those required. An application of the principle of least privilege.
For this we go to IAM > Roles and click Create Role
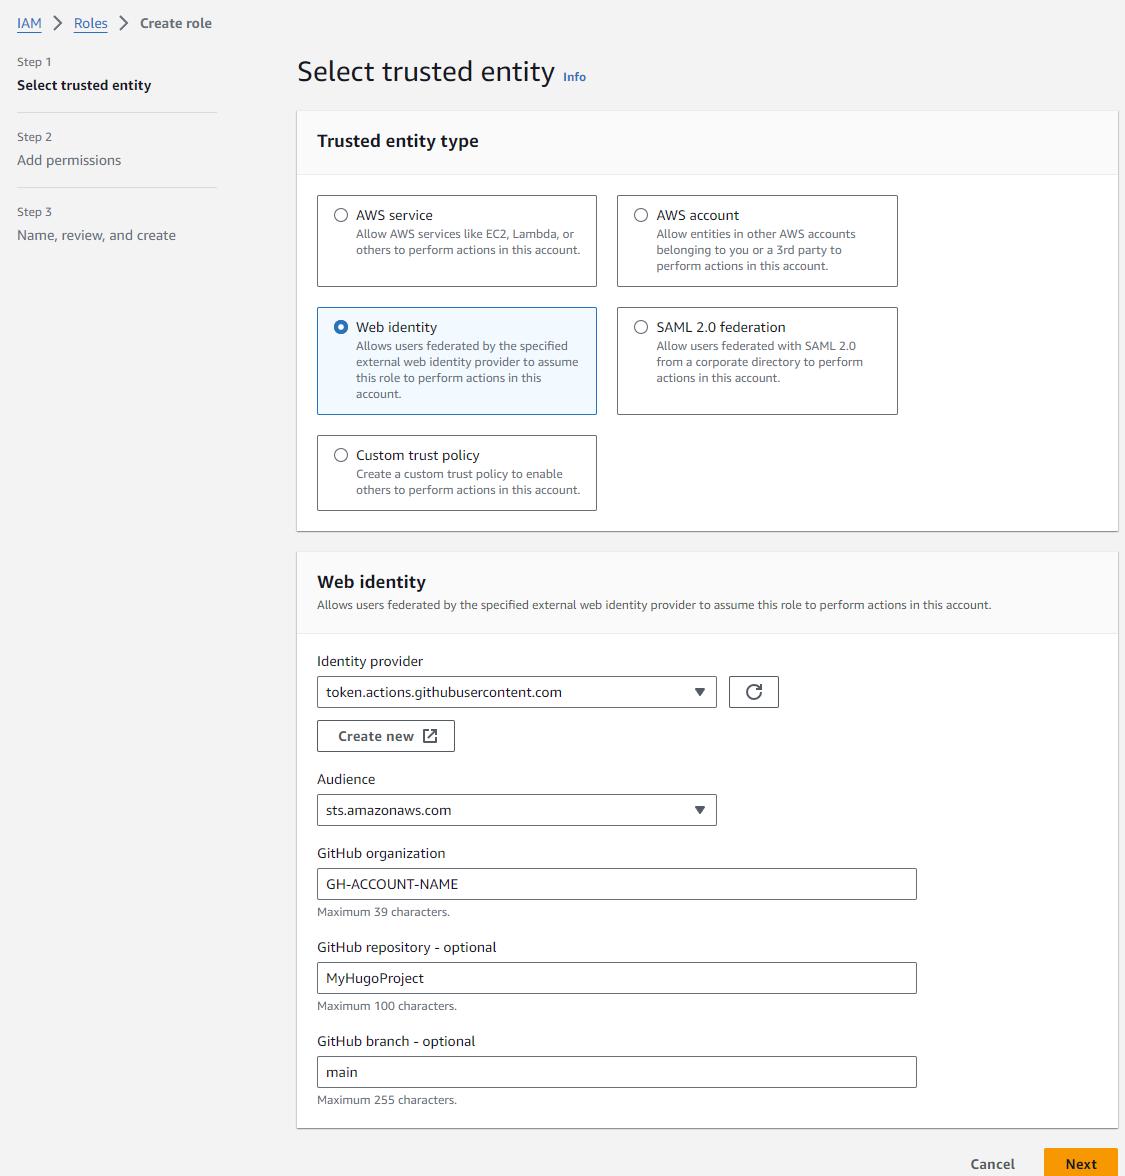
GitHub repository and branch are optional information, however we encourage you to provide this information to both reduce the impact of those credentials falling in the wrong hands but also simple mistakes (configuring the wrong repo name, branch, etc. and having bad things happen).
Click Next
Skip the next Add permissions screen as we will define the permission in an alternative way on the following screen. Click Next
In the Step 2 Section we review the information we entered on the Trusted Entity screen, in json format.
{
    "Version": "2012-10-17",
    "Statement": [
        {
            "Effect": "Allow",
            "Principal": {
                "Federated": "arn:aws:iam::123456789012:oidc-provider/token.actions.githubusercontent.com"
            },
            "Action": "sts:AssumeRoleWithWebIdentity",
            "Condition": {
                "StringEquals": {
                    "token.actions.githubusercontent.com:aud": "sts.amazonaws.com",
                    "token.actions.githubusercontent.com:sub": "repo:GH-ACCOUNT-NAME/MyHugoProject:ref:refs/heads/main"
                }
            }
        }
    ]
}
Step 2: Add permissions shows nothing at this time and that’s fine.
In Step 3, we add a tag, as discussed previously.
Then we click Create Role. Note that the role has no permission attached at this time. We’ll do that next.
Setting the Role’s permissions
Select the Role in the list and click on edit or the item’s link. We will create a couple Inline Policies. We choose inline policies in this context as those permissions are going to very specific to this role and unlikely to be reusable across many roles.
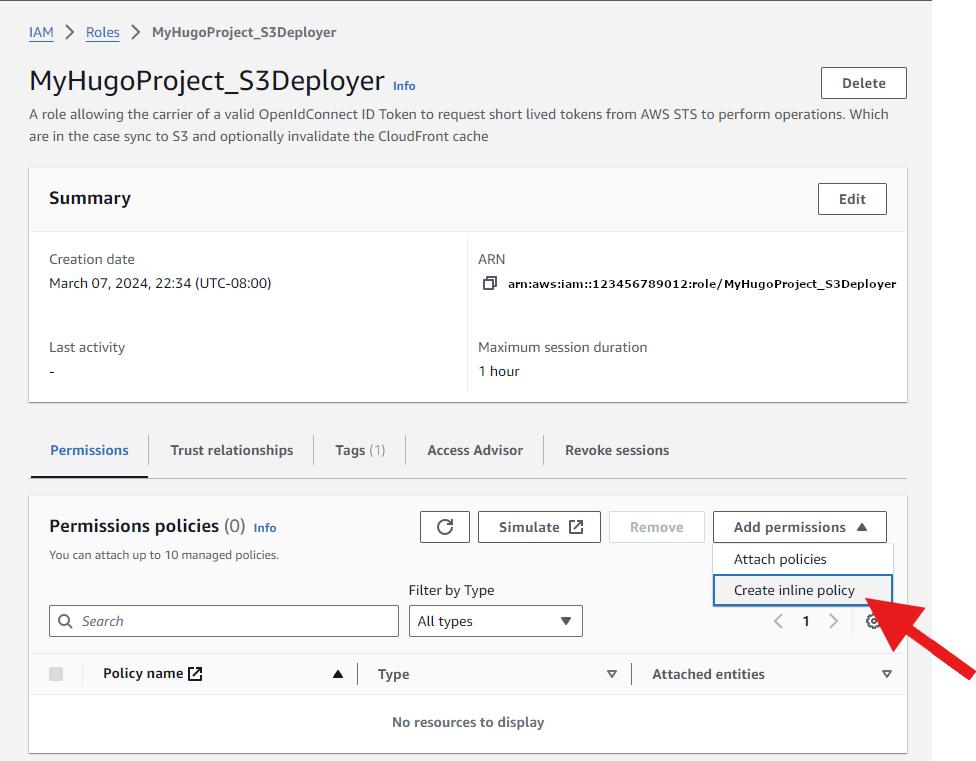
We will create 1 policy to allow syncing to S3, with only the minimum set of Actions required as per the Principle of Least Privileges.
The minimum set of permissions for syncing (with deletion of removed files):
- s3:ListBucket: This permission allows the user to list the contents of the S3 bucket.
- s3:GetObject: This permission allows the user to retrieve objects (files) from the S3 bucket.
- s3:PutObject: This permission allows the user to upload objects (files) to the S3 bucket.
- s3:DeleteObject: This permission allows the user to delete objects (files) from the S3 bucket.
You’ll notice that we need to target both the bucket Resource itself and its content.
{
	"Version": "2012-10-17",
	"Statement": [
		{
			"Sid": "SyncToBucket",
			"Effect": "Allow",
			"Action": [
				"s3:PutObject",
				"s3:GetObject",
				"s3:ListBucket",
				"s3:DeleteObject"
			],
			"Resource": [
				"arn:aws:s3:::myhugoproject.com/*",
				"arn:aws:s3:::myhugoproject.com"
			]
		}
	]
}
The second policy allows this role to invalidate (flush) the CloudFront cache. Which we will use after deploying a new website to ensure that users get the update as soon as possible.
{
	"Version": "2012-10-17",
	"Statement": [
		{
			"Sid": "FlushCache",
			"Effect": "Allow",
			"Action": "cloudfront:CreateInvalidation",
			"Resource": "arn:aws:cloudfront::123456789012:distribution/CFDISTRIBUTIONID"
		}
	]
}
We have created a role with permissions and conditions. This role can be ‘assumed’ by an authenticated user who will be granted the permissions allowing them to sync data in the S3 bucket and empty the associated CloudFront cache. Let’s now go on and configure the deployment mechanism in GitHub Actions
Configure the GitHub Workflow
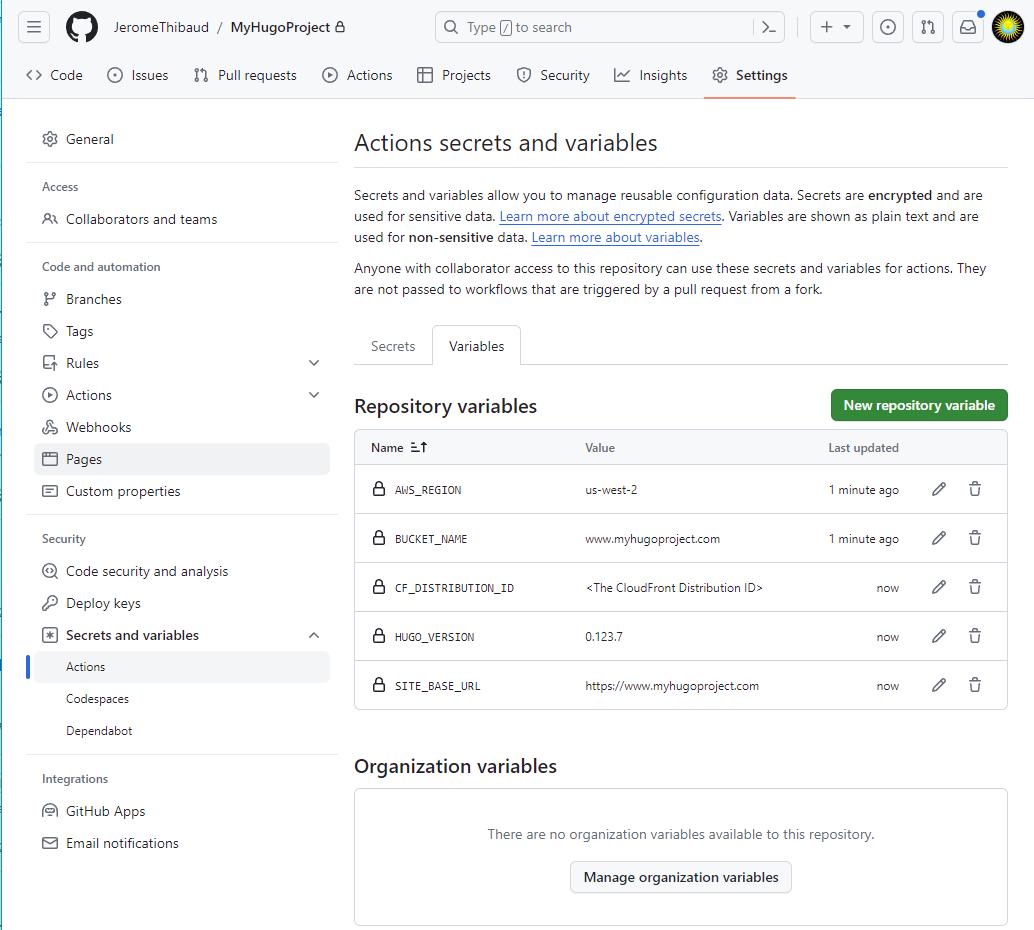
Create Variables which will be used by the workflow
The following variables could be hardcoded in the workflow script. But because they might change more frequently than the deployment script itself and because the script could be repurposed for another repositoty, creating variables can work as a way to limit the scope of change to that value only, therefore limiting the chances to introduce a bug in the script.
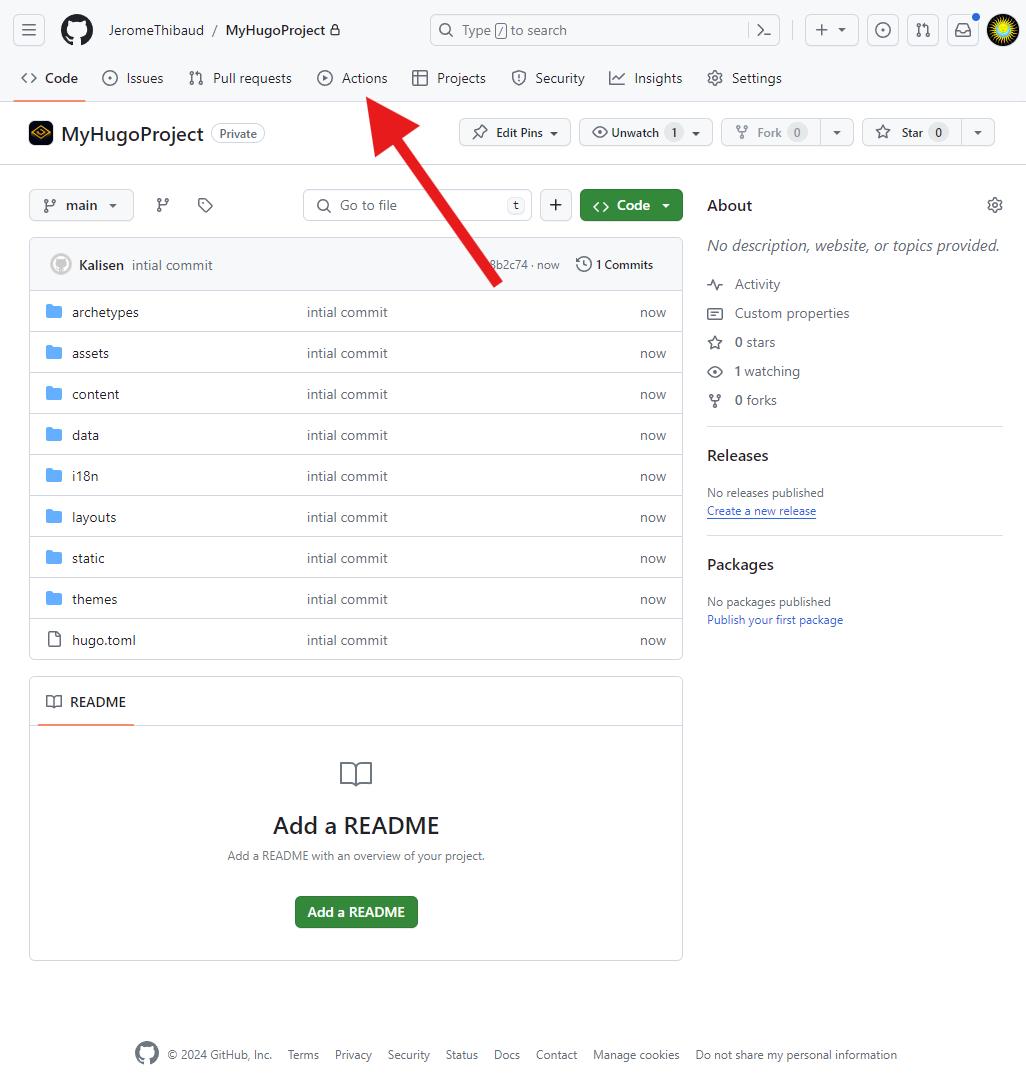
Create the Workflow
- Go to your repository
- Select the Actions menu
- Click New Workflow
- click “Skip this and set up a workflow yourself”
- Paste the workflow below
We will use the official AWS actions and use the “Hugo by GitHub Actions” template as the basis for our workflow.
Our workflow steps are:
- Build
- Start a Virtual Machine
- Install the Hugo framework of the version we specified
- Install Dart Sass (a Hugo dependency)
- Checkout our code from the repo
- build the production Hugo site
- store the resulting build for later retrieval
- Deploy
- Start a Virtual Machine
- Download the build artifact
- Configure AWS Credentials using OpenIDConnect
- Assume the Deployer role we created in AWS
- Sync the build folder to the S3 bucket
- Flush the CloudFront cache
A few notes:
The timestamps are always different because we rebuild the site each time in a brand new VM. However, using sync’s –size-only option to change the default behavior and skip timestamps comparison does not work in our context. Even files which have not changed size should be rebuilt with the new references to regenerated javascript files and other dependencies. A hash comparison should be used instead.
We use the –cache-control option because we are dealing with a static website and want to inform the callers that this information can be cached for a longer time to improve client performance.
In the following script, the value of ‘role-to-assume’ is the ARN of deployer role you created in earlier in this process
# Workflow for building and deploying a Hugo site to S3
name: Deploy Hugo site to S3

on:
  # Runs on pushes targeting the default branch
  push:
    branches: ["main"]

  # Allows you to run this workflow manually from the Actions tab
  workflow_dispatch:
# Sets permissions of the GITHUB_TOKEN to allow deployment to S3
permissions:
  contents: read
  id-token: write

# Allow only one concurrent deployment, skipping runs queued between the run in-progress and latest queued.
# However, do NOT cancel in-progress runs as we want to allow these production deployments to complete.
concurrency:
  group: "hugo_deploy"
  cancel-in-progress: false

# Default to bash
defaults:
  run:
    shell: bash

jobs:
  # Build job
  build:
    runs-on: ubuntu-latest
    env:
      HUGO_VERSION: ${{ vars.HUGO_VERSION }}
    steps:
      - name: Install Hugo CLI
        run: |
          wget -O ${{ runner.temp }}/hugo.deb https://GitHub.com/gohugoio/hugo/releases/download/v${HUGO_VERSION}/hugo_extended_${HUGO_VERSION}_linux-amd64.deb \
          && sudo dpkg -i ${{ runner.temp }}/hugo.deb
      - name: Install Dart Sass
        run: sudo snap install dart-sass
      - name: Checkout
        uses: actions/checkout@v4
        with:
          submodules: recursive
#      - name: Install Node.js dependencies
#        run: "[[ -f package-lock.json || -f npm-shrinkwrap.json ]] && npm ci || true"
      - name: Build with Hugo
        env:
          # For maximum backward compatibility with Hugo modules
          HUGO_ENVIRONMENT: production
          HUGO_ENV: production
        run: |
          hugo \
            --minify \
            --baseURL "${{ vars.SITE_BASE_URL }}/"
      - name: Upload a Build Artifact
        uses: actions/upload-artifact@v4.3.1
        with:
          name: hugo-site
          path: ./public

  # Deployment job
  deploy:
    runs-on: ubuntu-latest
    needs: build
    steps:
      - name: Download artifacts (Docker images) from previous workflows
        uses: actions/download-artifact@v4
        with:
          name: hugo-site
          path: ./public
      - name: "Configure AWS Credentials"
        uses: aws-actions/configure-aws-credentials@v4.0.2
        with:
          aws-region: ${{ vars.AWS_REGION }}
          role-to-assume: arn:aws:iam::123456789012:role/MyHugoProject_S3Deployer # this will be the ARN of the role you created in the "Creating a Role for deployment" step.
          role-session-name: GithubActions-MyHugoProject
          mask-aws-account-id: true
      - name: Sync to S3
        id: deployment
        run: aws s3 sync ./public/ s3://${{ vars.BUCKET_NAME }} --delete --cache-control max-age=31536000
      - name: Cloudfront Invalidation
        id: flushcache
        run: aws cloudfront create-invalidation --distribution-id ${{ vars.CF_DISTRIBUTION_ID }} --paths "/*"
Test the Workflow
since the workflow file is stored in the repo (under .GitHub/workflows) every change you make to this file should trigger a new build. But in case you’ve branched out and customized things a bit, you can still trigger this workflow manually thanks to the on:workflow_dispatch instruction
on:
  ...
  # Allows you to run this workflow manually from the Actions tab
  workflow_dispatch:
And with that, we're finished .
Conclusion
You made it!
Your website is online, secure, fast and every change you push to GitHub gets automatically deployed and made available to millions of users!
Congratulations! You deserve it. That was quite the task. And if you have needs beyond what is described here, don’t hesitate and get in touch .